Java synchronized实现线程同步
例如,我们统计多线程用户访问量,并输出访问信息,代码如下:
public class Account implements Runnable{
    private static int num;
    @Override
    public void run() {
        // TODO Auto-generated method stub
        try {
            Thread.currentThread().sleep(1);
        } catch (InterruptedException e) {
            // TODO Auto-generated catch block
            e.printStackTrace();
        }
        num++;
        System.out.println(Thread.currentThread().getName()+"是当前的第"+num+"位访客");
    }
}

public class AccountTest {
    public static void main(String[] args) {
        Account account = new Account();
        Thread t1 = new Thread(account,"线程1");
        Thread t2 = new Thread(account,"线程2");
        t1.start();
        t2.start();
    }
}
运行结果为:
线程1是当前的第2位访客
线程2是当前的第2位访客
这就是多线程同时访问共享数据时带来的隐患,项目中一定要解决这个问题。比如金融项目,涉及资金安全的对这部分要求是非常严格的。那么如何来解决这个问题呢?
需要使用线程同步,可以通过 synchronized 修饰方法来实现线程同步,每个 Java 对象都有一个内置锁,内置锁会保护使用 synchronized 关键字修饰的方法,要调用该方法必须先获得内置锁,否则就处于阻塞状态,具体实现如下:
public class Account implements Runnable{
    private static int num;
    @Override
    public synchronized void run() {
        // TODO Auto-generated method stub
        try {
            Thread.currentThread().sleep(1);
        } catch (InterruptedException e) {
            // TODO Auto-generated catch block
            e.printStackTrace();
        }
        num++;
        System.out.println(Thread.currentThread().getName()+"是当前的第"+num+"位访客");
    }
}
再次运行程序,结果如下:
线程1是当前的第1位访客
线程2是当前的第2位访客
假设线程 1 先到,获取了 run() 方法的锁,之后线程 2 到了,发现 run() 方法被锁起来了。要调用方法必须拿到锁,但是此时锁被线程 1 获取了,只有当线程 1 调用完方法之后才会释放锁。执行了一次 num++,然后输出信息,之后线程1释放内置锁。线程 2 获取到了内部锁,由阻塞状态进入运行状态,调用 run() 方法,再一次执行 num++ 并输出信息。两个线程是按照先后顺序来执行的,并没有同时去修改 num,所以看到了正确的结果。
synchronized 可以修饰实例方法,也可以修饰静态方法,但是两者在使用上是有区别的。接下来,我们通过实际的例子来学习,现有程序如下:
public class SynchronizedTest {
    public static void main(String[] args) {
        for(int i = 0; i < 5;i++) {
            Thread thread = new Thread(new Runnable() {
                @Override
                public void run() {
                    // TODO Auto-generated method stub
                    SynchronizedTest.test();
                }
            });
            thread.start();
        }
    }
    public static void test() {
        System.out.println("start...");
        try {
            Thread.currentThread().sleep(1000);
        } catch (InterruptedException e) {
            // TODO Auto-generated catch block
            e.printStackTrace();
        }
        System.out.println("end...");
    }
}
运行程序,结果为:
start...
start...
start...
start...
start...
end...
end...
end...
end...
end...
好了,现在我们给 test() 方法添加 synchronized 关键字,避免多线程并行访问的问题,代码如下:
public synchronized static void test() {
        System.out.println("start...");
        try {
            Thread.currentThread().sleep(1000);
        } catch (InterruptedException e) {
            // TODO Auto-generated catch block
            e.printStackTrace();
        }
        System.out.println("end...");
}
再次运行程序,结果为:
start...
end...
start...
end...
start...
end...
start...
end...
start...
end...
上述代码中 synchronized 修饰的是静态方法,现在用 synchronized 修饰实例方法,代码如下:
public class SynchronizedTest {
    public static void main(String[] args) {
        for(int i = 0; i < 5;i++) {
            Thread thread = new Thread(new Runnable() {
                @Override
                public void run() {
                    // TODO Auto-generated method stub
                    SynchronizedTest synchronizedTest = new SynchronizedTest();
                    synchronizedTest.test();
                }
            });
            thread.start();
        }
    }
    public synchronized void test() {
        System.out.println("start...");
        try {
            Thread.currentThread().sleep(1000);
        } catch (InterruptedException e) {
            // TODO Auto-generated catch block
            e.printStackTrace();
        }
        System.out.println("end...");
    }
}
运行结果为:
start...
start...
start...
start...
start...
end...
end...
end...
end...
end...
看到这里,大家可能会有疑问了,本节的第一个案例“统计访问量”中,synchronized 修饰的也是实例方法,为什么就可以实现同步呢?因为实例方法中操作的变量 num 是静态的,所以还是多线程在共享资源,线程同步的本质是锁定多个线程所共享的资源。
synchronized 还可以修饰代码块,会为代码块加上内置锁,从而实现同步。在静态方法中添加 synchronized 可以同步代码块,例如:
public class SynchronizedTest {
    public static void main(String[] args) {
        for(int i = 0; i < 5;i++) {
            Thread thread = new Thread(new Runnable() {
                @Override
                public void run() {
                    // TODO Auto-generated method stub
                    SynchronizedTest.test();
                }
            });
            thread.start();
        }
    }
    public static void test() {
        synchronized (SynchronizedTest.class) {
            System.out.println("start...");
            try {
                Thread.currentThread().sleep(1000);
            } catch (InterruptedException e) {
                // TODO Auto-generated catch block
                e.printStackTrace();
            }
            System.out.println("end...");
        }
    }
}
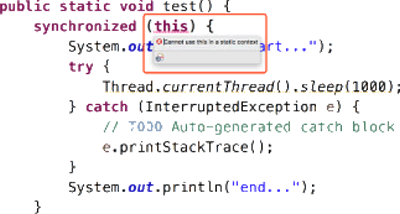
synchronized() 内设置需要加锁的资源,静态方法是属于类的方法,不属于任何一个实例对象。所以静态方法中的 synchronized() 只能锁定类,不能锁定实例,this 可以表示当前的一个实例。
程序会自动报错,静态方法中不能使用 this 关键字。同理静态方法中也不能锁定实例变量,只能锁定静态变量,程序运行结果为:
start...
end...
start...
end...
start...
end...
start...
end...
start...
end...
在实例方法中也可以添加 synchronized 同步代码块,具体实现如下:
public class SynchronizedTest {
    public static void main(String[] args) {
        for(int i = 0; i < 5;i++) {
            Thread thread = new Thread(new Runnable() {
                @Override
                public void run() {
                    // TODO Auto-generated method stub
                    SynchronizedTest synchronizedTest = new SynchronizedTest();
                    synchronizedTest.test();
                }
            });
            thread.start();
        }
    }
    public void test() {
        synchronized (this) {
            System.out.println("start...");
            try {
                Thread.currentThread().sleep(1000);
            } catch (InterruptedException e) {
                // TODO Auto-generated catch block
                e.printStackTrace();
            }
            System.out.println("end...");
        }
    }
}
运行结果为:
start...
start...
start...
start...
start...
end...
end...
end...
end...
end...
只需要锁住共享资源即可,实例对象是每个线程独有的,类则是共享的,所以锁定类即可,代码如下:
public void test() {
    synchronized (SynchronizedTest.class) {
        System.out.println("start...");
        try {
            Thread.currentThread().sleep(1000);
        } catch (InterruptedException e) {
            // TODO Auto-generated catch block
            e.printStackTrace();
        }
        System.out.println("end...");
    }
}
运行结果为:
start...
end...
start...
end...
start...
end...
start...
end...
start...
end...
 ICP备案:
 公安联网备案: